How to Configure an Email Account on macOS
This tutorial assumes you have already created your email address in your cPanel control panel.
See “Create an Email in cPanel” for details.
1- Open Mail App:
- Click on Mail, then go to Accounts….
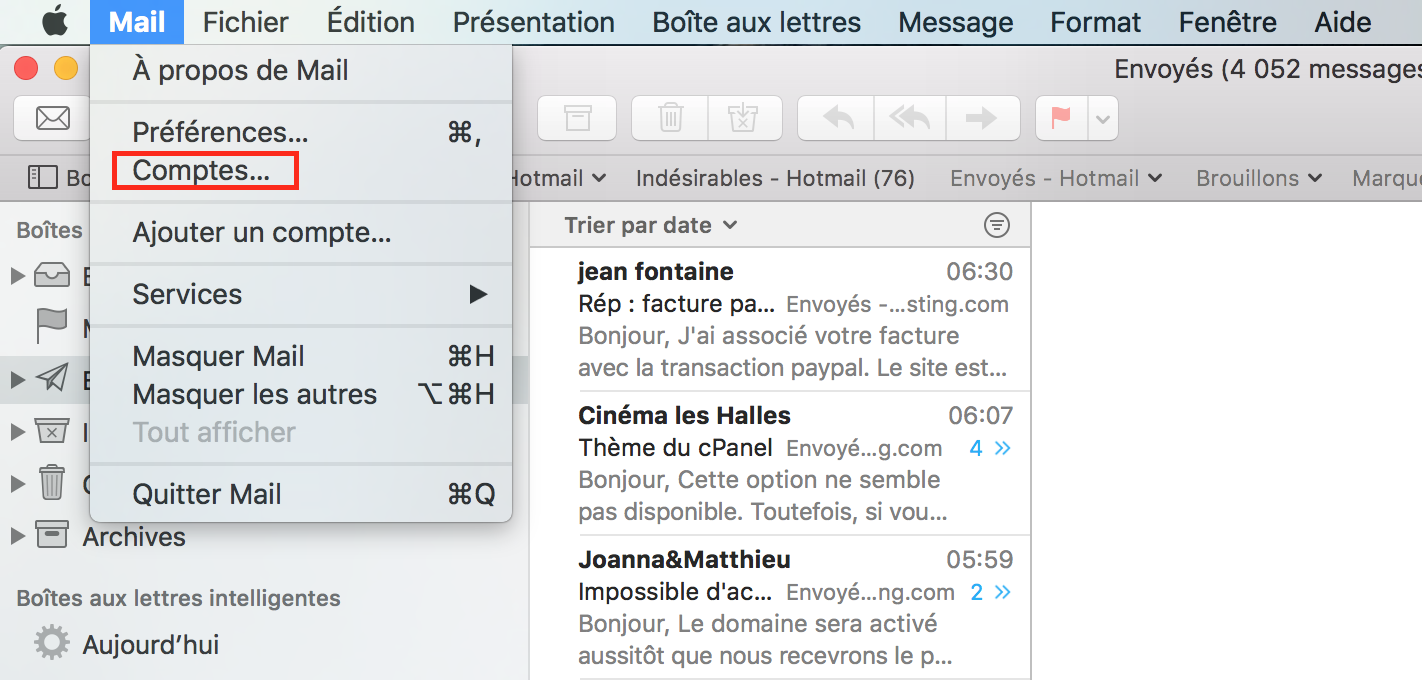
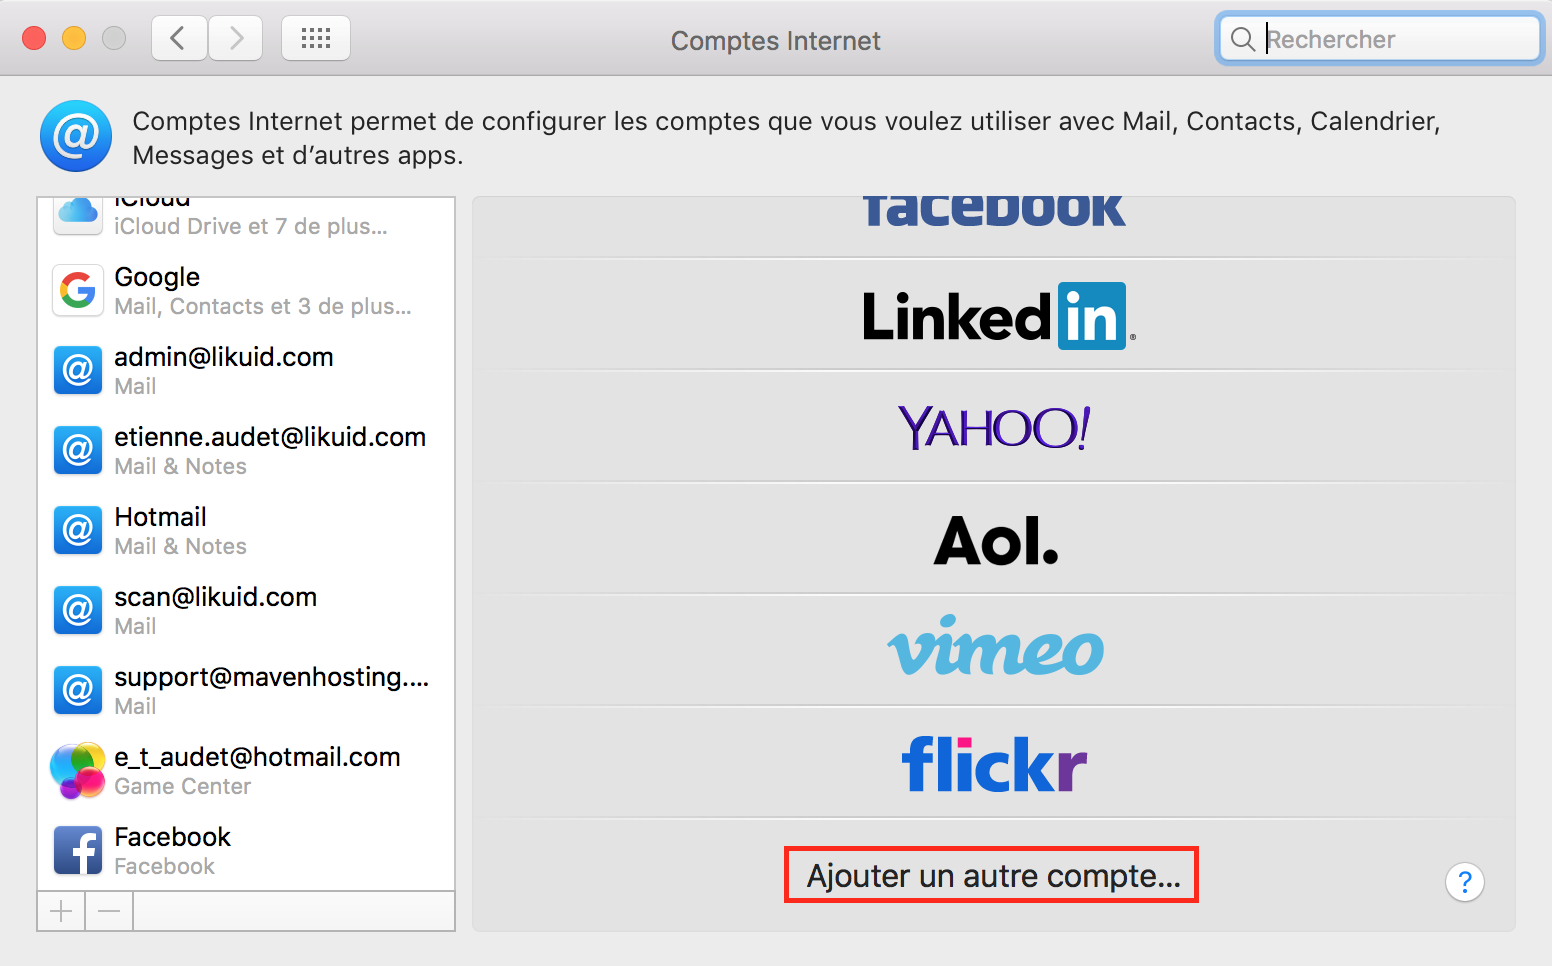
2- Add Account:
- Click on Add Other Account….
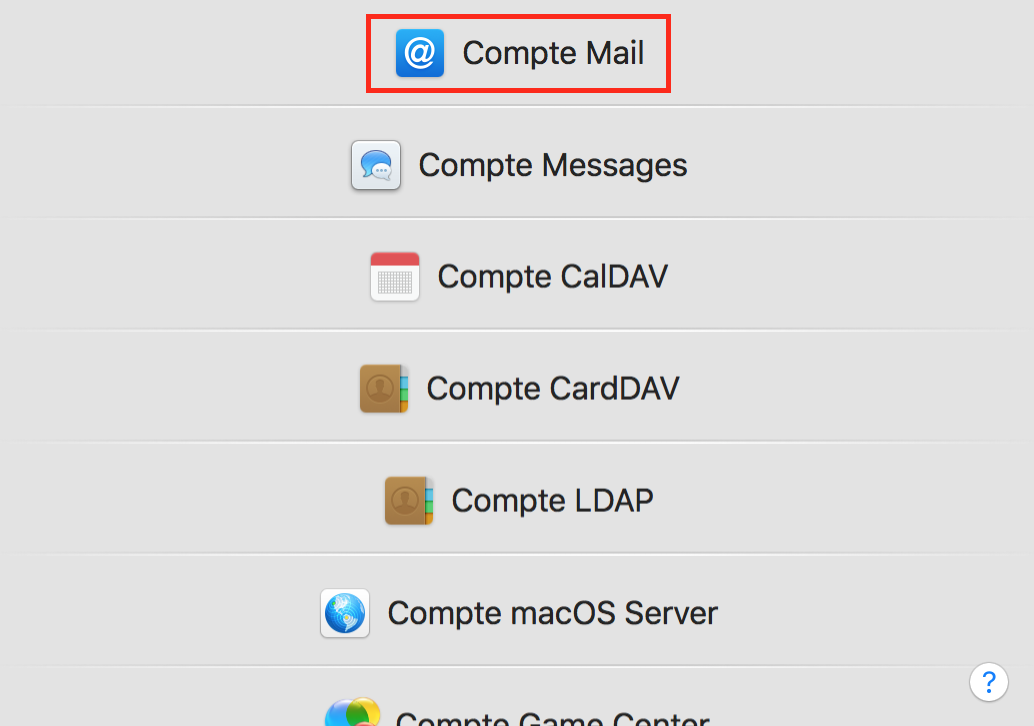
3- Choose Account Type:
- Select Mail account.
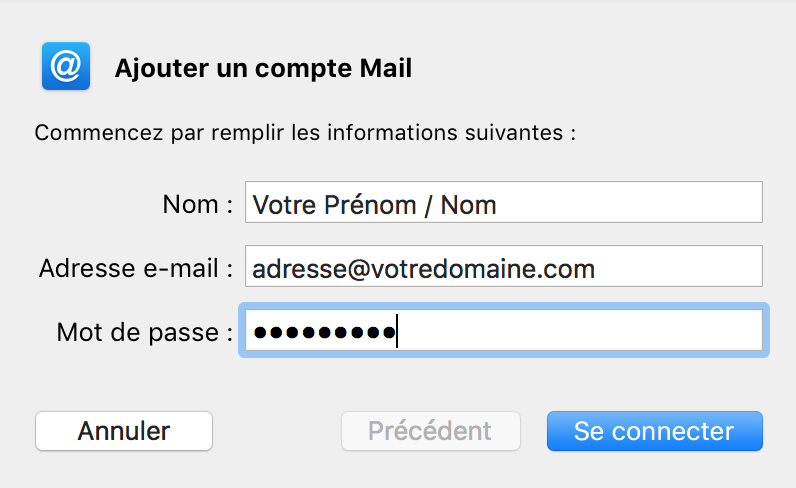
4- Enter Account Information:
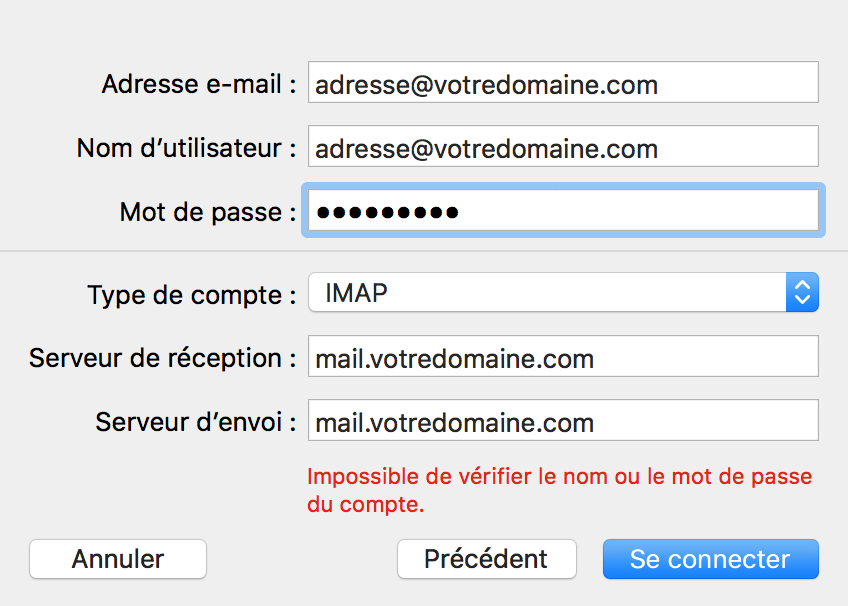
- Enter the name you want to appear when you send emails, your full email address, and your password.
5- Server Information:
- Enter your username (your full email address), the incoming server (mail.yourdomain.com), and the outgoing server (mail.yourdomain.com). Note that mail.yourdomain.com will be replaced by your actual domain.
6- Account Description:
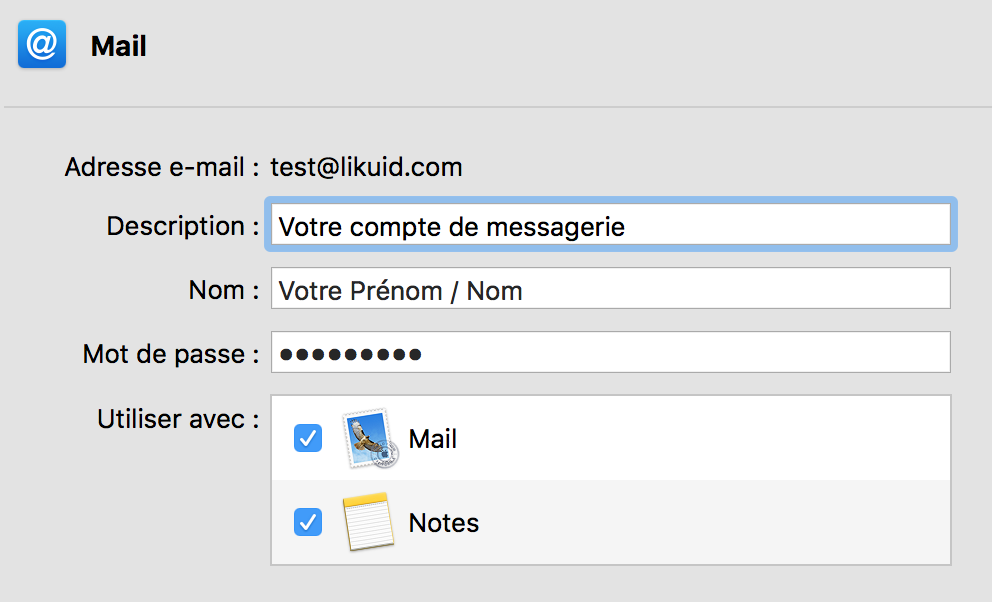
- You can choose a description for your account in the application and decide to sync mail and notes.
7- Verify Settings:
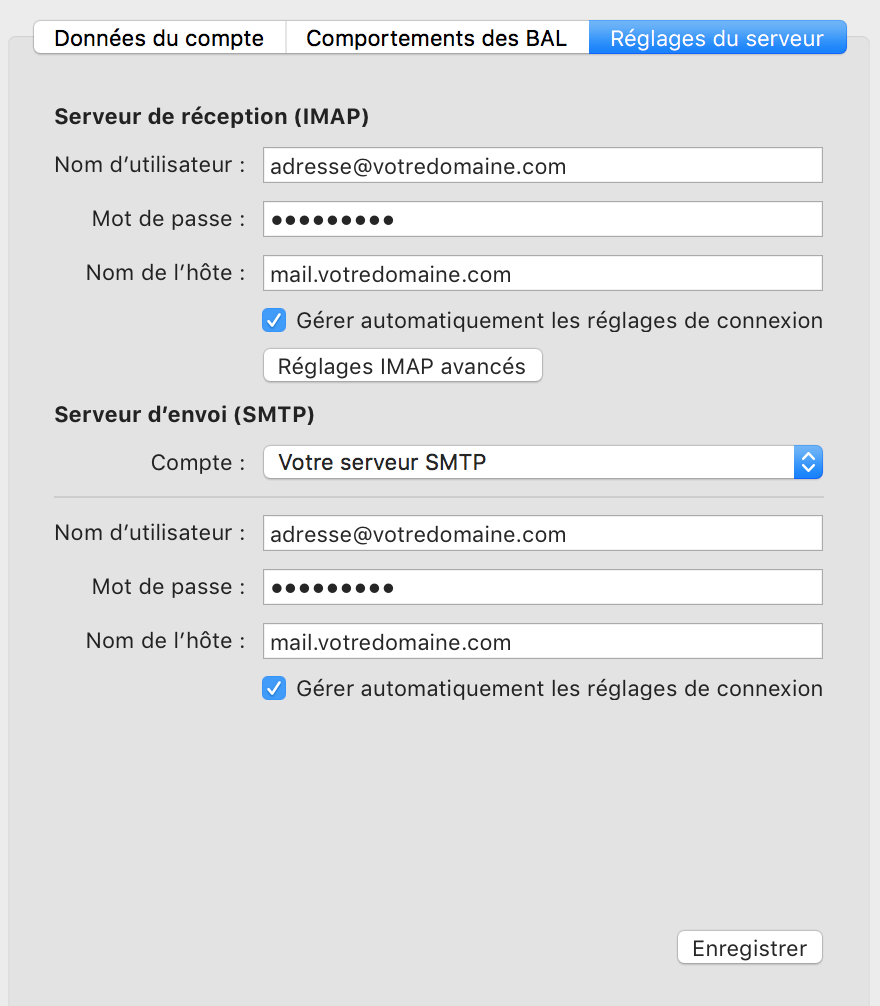
- Normally, these settings should work, and your email should be functional.
8- Troubleshooting:
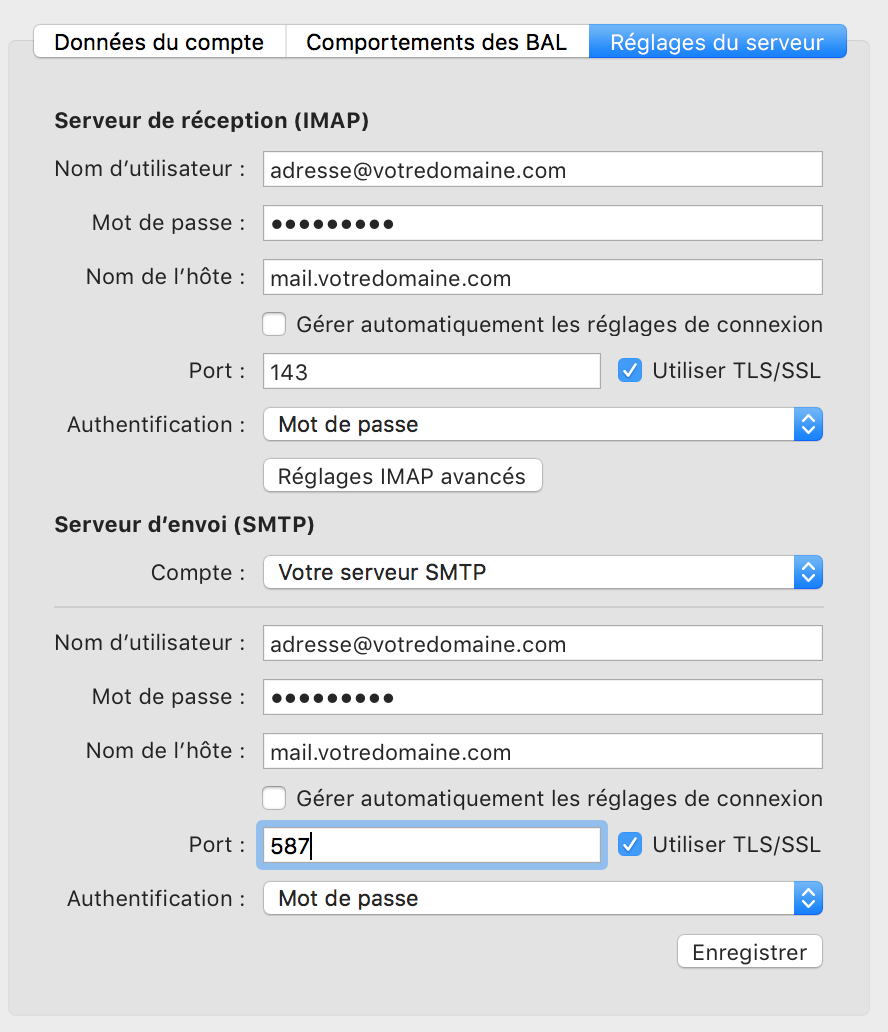
- If you encounter a problem, uncheck the box “Automatically manage connection settings” and ensure you have the following settings:
- Incoming Server (IMAP): Port 993 with SSL/TLS encryption.
- Outgoing Server (SMTP): Port 465 with SSL/TLS encryption.
- Username: The full email address for both incoming and outgoing servers.
9- And that’s it! You can now send and receive your emails.
How to Import a WordPress Installation into Softaculous
1- Log in to your cPanel. See how: https://secure.likuid.com/knowledgebase.php?action=displayarticle&id=143
2- Open the Softaculous program.

3- Click on WordPress.

4- Click on “Import“.

5- Choose the correct domain/site.

6- Ensure that the “In Directory” field matches the correct WordPress installation directory. In most cases, it should be empty.

7- Click on “Import“.

8- Congratulations, you have successfully imported your WordPress installation into Softaculous.

First method:
1 – Open an internet browser and enter the following URL in the address bar: http://yourdomainname.com:2083
2 – Enter your username and password. You can find these credentials in the welcome email.
Second method:
1 – Go to your client area at the URL: https://secure.likuid.com/clientarea.php
2 – In your client area, go to the “Services” menu and then to “My Products and Services”.
3 – Next, click on the green “Active” button.
4 – Click on “Login to cPanel”.
5 – You are now in your cPanel.
How to Clear the Browser Cache
How to Clear Cache in Google Chrome:
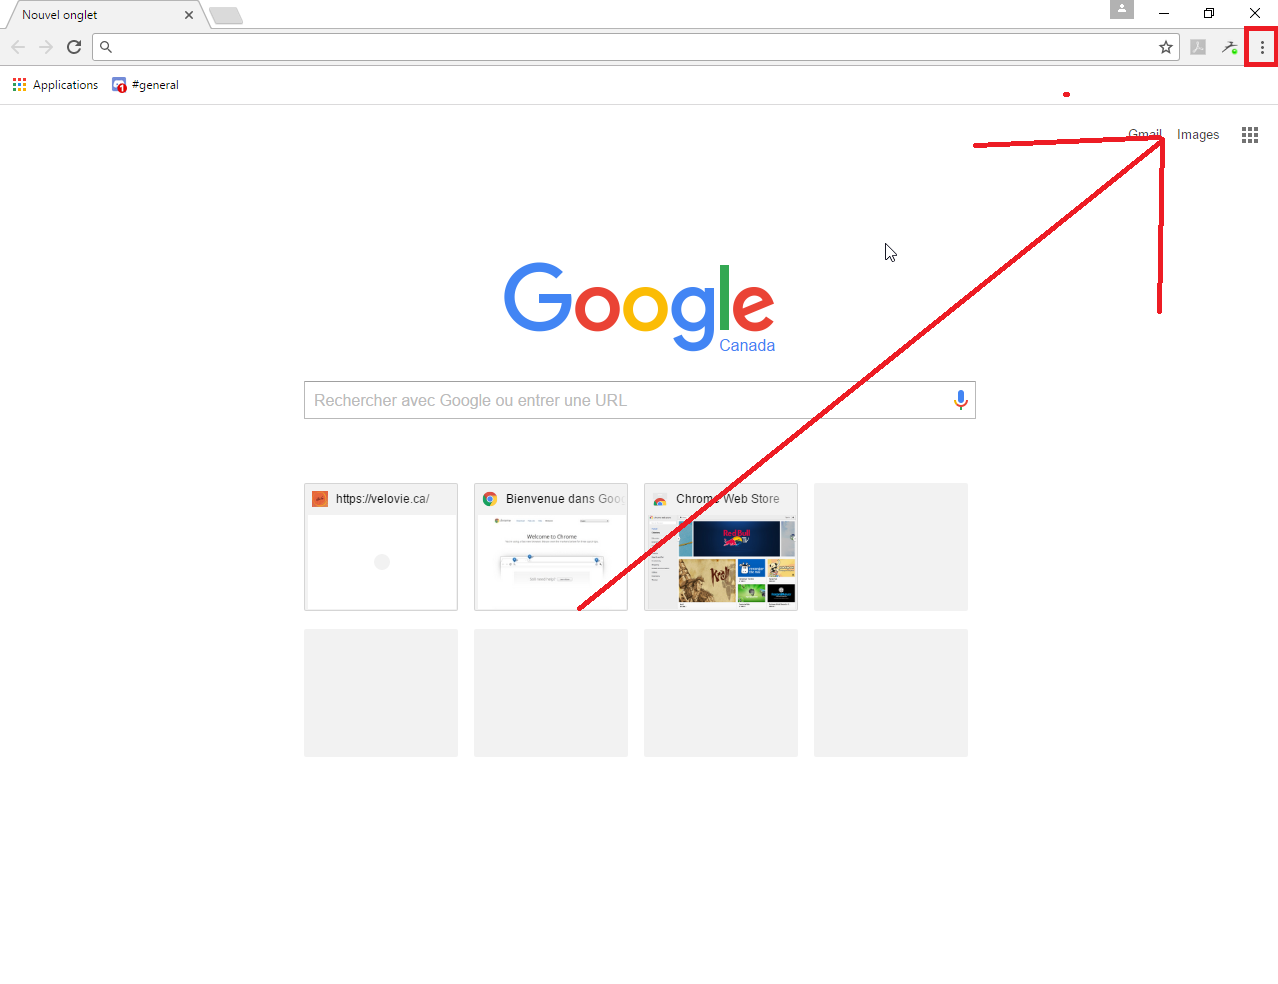
1- Open the menu at the top right:
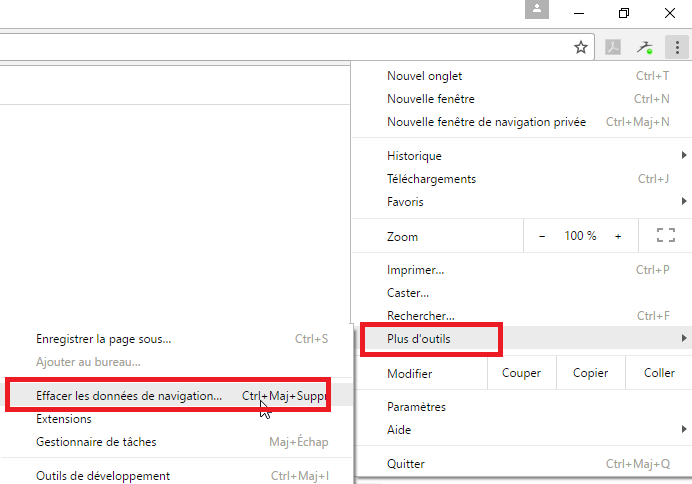
2- Go to the “More tools” menu and click on “Clear browsing data”.
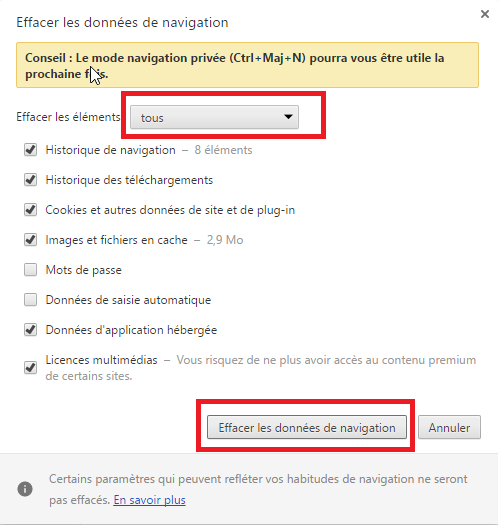
3. Select “all” in the “Time range” field, check all the options, and click on “Clear browsing data”.
How to Clear Cache in Mozilla Firefox:
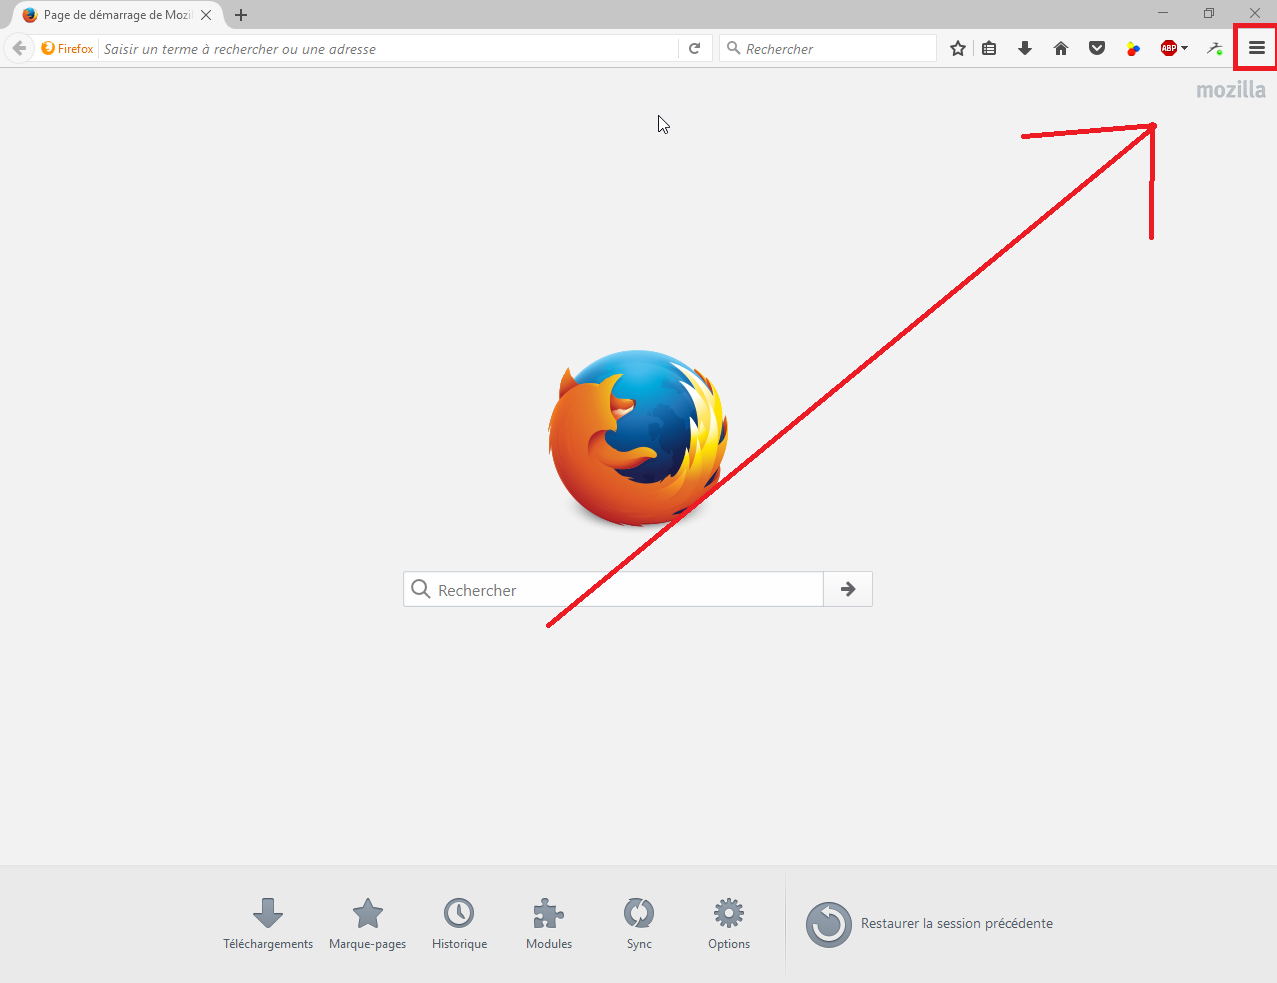
1- Open the menu at the top right.
2- Go to Options.
3- Go to the “Privacy & Security” tab and click on “Clear recent history”.
4. In the “Time range to clear” field, select “everything”, check all the options, and click on “Clear now”.
How to Clear Cache in Internet Explorer:
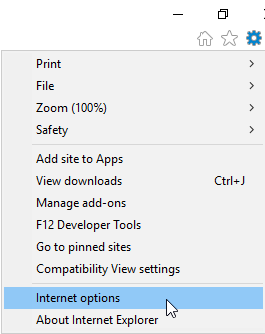
1- Open the menu at the top right and click on “Internet options”.
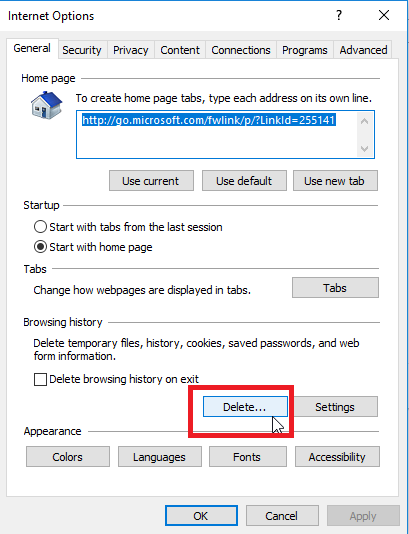
2- Click on the “Delete” button in the “General” tab.
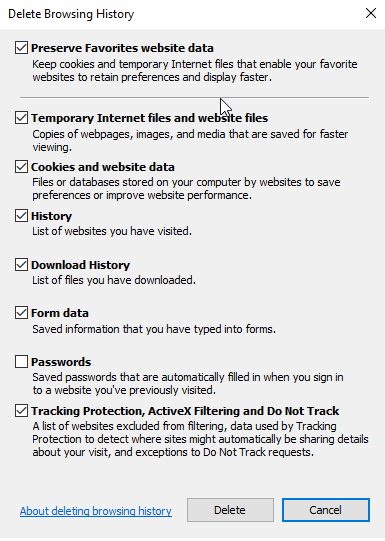
3- Check all the options and click on “Delete”.
How to clear the system DNS cache.
On Windows 7:
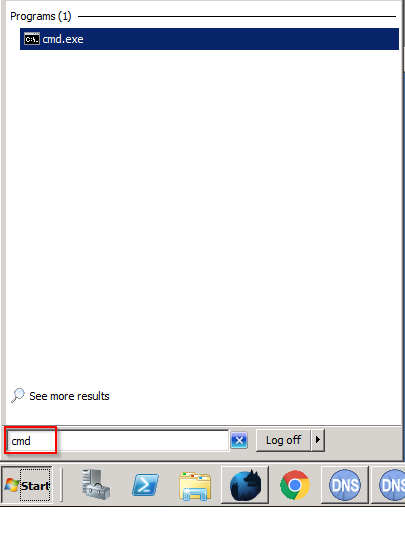
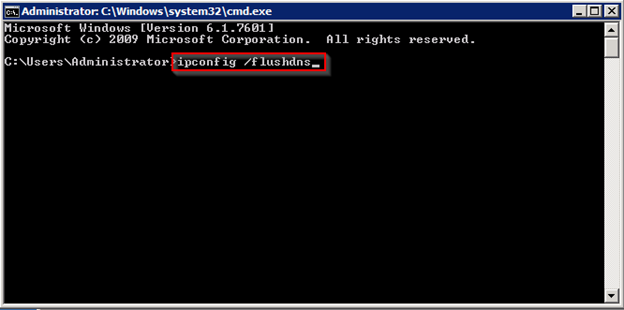
1 – Go to the Start menu and search for: cmd, then click on cmd.exe that appears.
2 – In the command prompt, type: ipconfig /flushdns and then press Enter.
3 – You will receive a success message once completed.
On Windows 8/10:
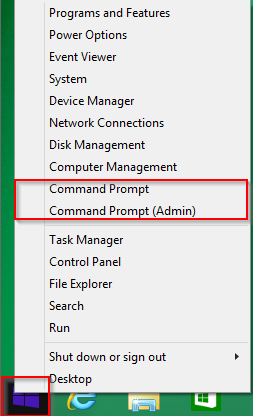
1 – Right-click on the Windows icon from the old Start menu at the bottom left of the screen.
2 – Choose the option Command Prompt (noted as Command Prompt in the image), note that you can choose with or without admin privileges, it doesn’t matter.
3 – In the command prompt, type: ipconfig /flushdns and then press Enter. You will receive a success message.
On Mac OSX:
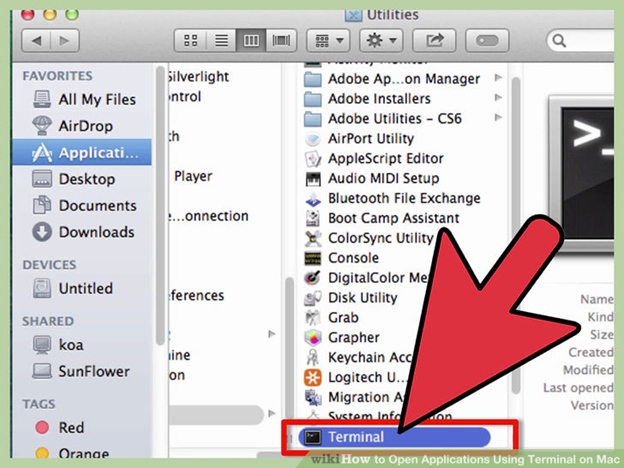
The following commands should be entered in the Terminal.
- OS X Yosemite and later: :
sudo killall -HUP mDNSResponder
- OS X Mavericks, Mountain Lion, and Lion:
sudo killall -HUP mDNSResponder
- Mac OS X Snow Leopard:
sudo dscacheutil -flushcache
How to Change WordPress Directory or Location and Configure It
It is advisable to install the blog and all WordPress files in a dedicated directory from the start. This prevents cluttering the root directory and avoids mixing everything up if additional items are added to the server space later on.
However, the blog can also be launched from the root directory with just the domain name in .fr, .com, .info, etc. For example, by typing in your browser: http://www.example.com.
If this configuration wasn’t done initially, WordPress can still be moved to its own directory by following these steps:
Steps to Follow:
- Create the new location where the WordPress core files will be stored using Filezilla, for example (in this example, the directory name used is /myblog).
- Go to the configuration panel, Settings, and General.
- In the WordPress Address field, replace the existing address with the new location of your WordPress core files. Example: http://example.com/myblog
- In the Site Address field, replace the existing address with the URL of your root directory. Example: http://example.com
- Click on Save Changes.
- Move the WordPress core files to the new location (in this case /myblog), again using Filezilla.
- Copy the
index.phpand.htaccessfiles to the root of your site. (example.com).- Open the
index.phpfile located in the root directory with a text editor (right-click and edit).- Make the following changes. Change the line:
require('./wp-blog-header.php');to the following line, using the directory name of your WordPress core files:
require('./myblog/wp-blog-header.php');then save the file.
- Log in to administer your blog from the new location. This should now be http://example.com/myblog/wp-admin.
- If permalinks were configured, go to the Permalinks Settings panel and update the permalink structure.
Note: By default, WordPress uses web addresses containing a question mark and a string of numbers. However, WordPress offers the possibility to create a custom address structure for permalinks and archives. This can improve the aesthetics, usability, and longevity of the links.
It is recommended to use a custom permalink structure, which is appreciated by both Google and readers! A suggested structure is:
/%day%/%monthnum%/%year%/%postname%/, as it displays the date in European format and the article title in plain text. WordPress will automatically update the.htaccessfile.If WordPress was installed in a directory from the start, begin only from step 3.
The .htaccess File
The
.htaccessfiles are customizable configuration files for your host (for Apache servers).They can be used to modify access rights, create redirects, and write custom error messages.
They can be placed in any directory of the blog or hosting space, and the configuration will then apply to the directory and all directories it contains.
To create a
.htaccessfile, create a new file using a text editor (Notepad, for example) on your PC and save it ashtaccess.txt.Then, once created, transfer the file with Filezilla and rename it on the server to
.htaccess, as Windows does not allow saving files as.htaccess.Here are the lines that make up the
.htaccessfile: (myblog being, of course, the example of the installation directory)# BEGIN WordPress RewriteEngine On RewriteBase /myblog/ RewriteCond %{REQUEST_FILENAME} !-f RewriteCond %{REQUEST_FILENAME} !-d RewriteRule . /myblog/index.php [L] AddType x-mapp-php5 .php DirectoryIndex index.php/ # END WordPressNote: the line
AddType x-mapp-php5 .phpis specific to 1&1, it forces the use of the PHP v5 engine.
Resetting Your WordPress Password
- Log in to your cPanel.
- Open the File Manager.
`
3. Open the wp-config.php file of your WordPress installation.
- Find the line that indicates the name of your database.
- Return to cPanel and open phpMyAdmin.
- Scroll through the tables by clicking on the “+” symbol.
- Open the table that ends with “users” by clicking on it.
- Click on Edit to the left of the user with ID number 1.
- In the “Function” field of the “user_pass” column, choose MD5 and enter your new password in the “Value” field. You need to delete the characters that were already present. Then, click on Go.
- Once you click on “Go”, you will be able to log in to your WordPress with the new password you chose.
How to Clone a WordPress Site with Softaculous:
- Log in to your cPanel. See how: https://secure.likuid.com/knowledgebase.php?action=displayarticle&id=143
- Open Softaculous.
3. Click on WordPress.
4. Find your WordPress installation in Softaculous. If your installation is not listed, you will need to import it as per the following procedure: https://secure.likuid.com/knowledgebase.php?action=displayarticle&id=148
5. Click on the “Clone” button.
6. Choose the correct domain name. This is the domain on which we want to clone the WordPress site.
7. Ensure that the “In Directory” field corresponds to the correct WordPress installation directory. In most cases, it should be empty.
8. Scroll down to the bottom of the page and click on “Clone Installation”.
9. Congratulations, you have cloned your website.

How to Create an Email Address:
- Log in to cPanel. See how: https://secure.likuid.com/knowledgebase.php?action=displayarticle&id=143
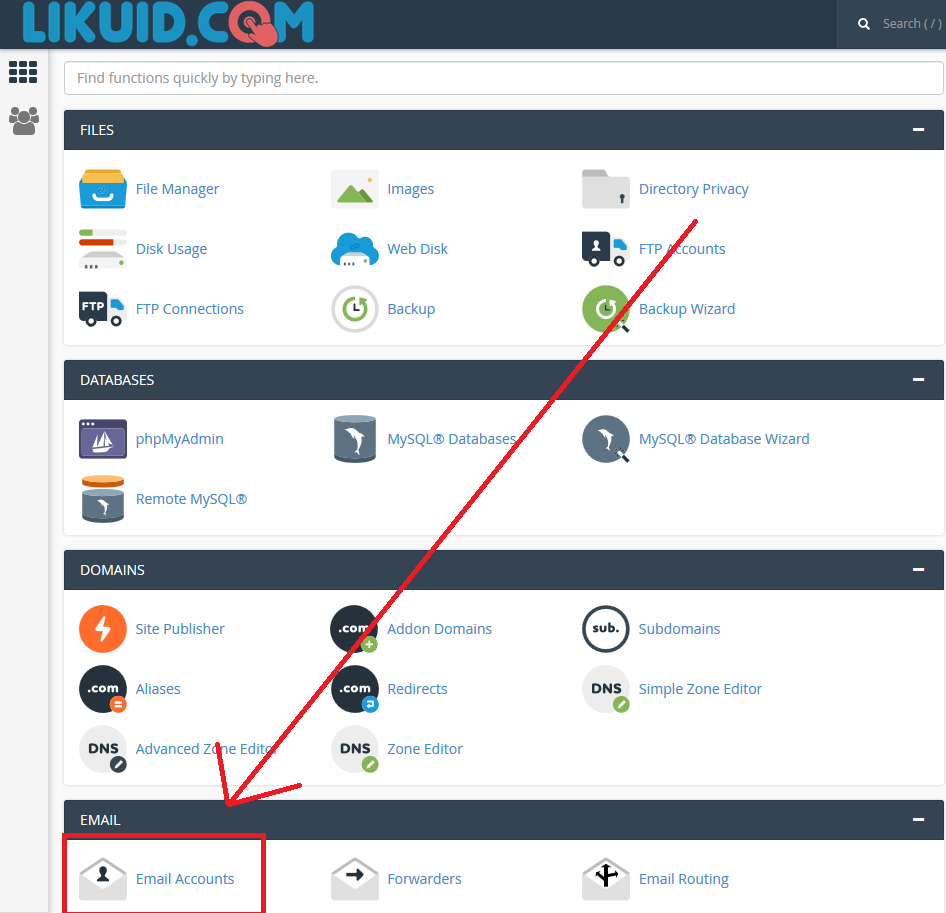
- In cPanel, click on “Email Accounts”.
3. Click on the “Manage” button to the right of the email address you want to edit.
4. Enter the new password.
5. At the bottom of the page, click on “Update Email Settings”.
6. You will see a green window at the top right confirming the password reset.

Setting Up Email on Your Phone
1- Once in cPanel, go to the “Email Accounts” option.
2- Click on “Set up Mail Client”.
3- Download the script corresponding to your version.
4- Once downloaded, you need to open and run the script on your phone.


